
That first frost is either looming, or already fallen for many of us with outdoor gardens. But, you can plant a few crops in the fall, even in the North! Garlic is a fall planting staple, and you can even add it as an afterthought, by using store-bought cloves in some zones. I did, and that’s my main focus here this week. I am in the middle of a 2 week+ period of sudden warmer weather, and decided it would be a good time to let the garlic sprout before frost hits hard. Garlic should be planted about 3 weeks before frost to better establish its roots before hard freezes begin.
Types of Garlic
There are two main types of garlic. You want to consider which type is best for your hardiness zone, storage space and style, usage levels, and preferences for fancy fresh new parts of garlic (if you haven’t grown it before).
Hardneck Garlic
This type of garlic forms lovely, fresh, flower stems that resemble long, looping green beans. They are delicious and many come up in the springtime. These stems are scapes, and you need to be remove them at a certain point, so the bulbs themselves get more energy to grow to a good size.
This type of bulb is larger and more uniform than softneck, and has a stronger, spicier flavor. The cloves are easier to peel. They preserve for a shorter time period, but can be planted in fall, in zones 9-4, maybe even 2. Hardneck is quite frost hardy!
If you want to plant it, order it from a nursery, farmer’s market or supplier. I do not have experience planting hardneck, or scapes, but I found a great site with pictures and recipes for scapes and this type of garlic here.
Softneck Garlic
Much of the garlic we buy in grocery stores is softneck. It has a milder flavor, blending better in dishes that need to be well-seasoned, but are not garlic forward. You can braid the plants together, to cure and store them, creating wonderful, old-fashioned decorations to hang in your kitchen. It grows better in mild to medium climates, but can survive somewhat colder zones with proper light, drainage and mulching.
I read a few sites, most of them commercially selling garlic seed bulbs, warning not to plant store-bought garlic, which is usually softneck. I saw that there are a few ways, “if you must,” plant store-bought garlic, to mitigate the risk of spreading microscopic nematodes into your soil long-term. It is not my intention to make light of these risks. Nematodes aren’t visible and their presence on produce may not leave evidence for us to see either. Some of the pre-treatments that you can use to reduce risk of nematodes before planting can be found HERE (scroll a little past halfway down).
I decided to plant mine as-is, but make sure it is at least organic and grown in the US, to get them in today.
Fall Planting Softneck Store-bought Garlic
sort
I started the process by carefully removing the garlic cloves from the bulb, keeping them individually wrapped, taking care not to bruise or nick the cloves with nails. The knife opened the bag, and was NOT used to separate the cloves!

and large (for planting to make bulbs).
Treat
If you choose to pre-treat your garlic to prevent potential microorganisms, do so before planting. See the Softneck section for a link to potential treatments.
prepare your soil
Your garlic can stand some shade, but it grows biggest and best with at least 6 hours of sun. Find a sunny spot for it if possible. It can be planted near most as great companion plants; it deters squirrels and many other pests, and has fungicide qualities. Do not plant it near beans, peas, asparagus, strawberries, parsley, or sage.
My chosen bed was covered in fallen leaves, old plants, weeds and a bit of hay, so it needed cleanup before planting.

I pulled out everything but the soil, taking care to remove long roots from this year’s plants. The dirt was light and airy, so it did not need to be loosened, or mixed with compost. It has good drainage and density. It is very import that garlic has well-draining soil, to prevent rot, and it seems that this doubly applies to softneck in my zone 6. I then dug trenches for my big cloves. I suggest adding bone meal or other garlic friendly nutrients like seaweed treatment first, but I did not have any. The soil was ready!
Spacing and Depth
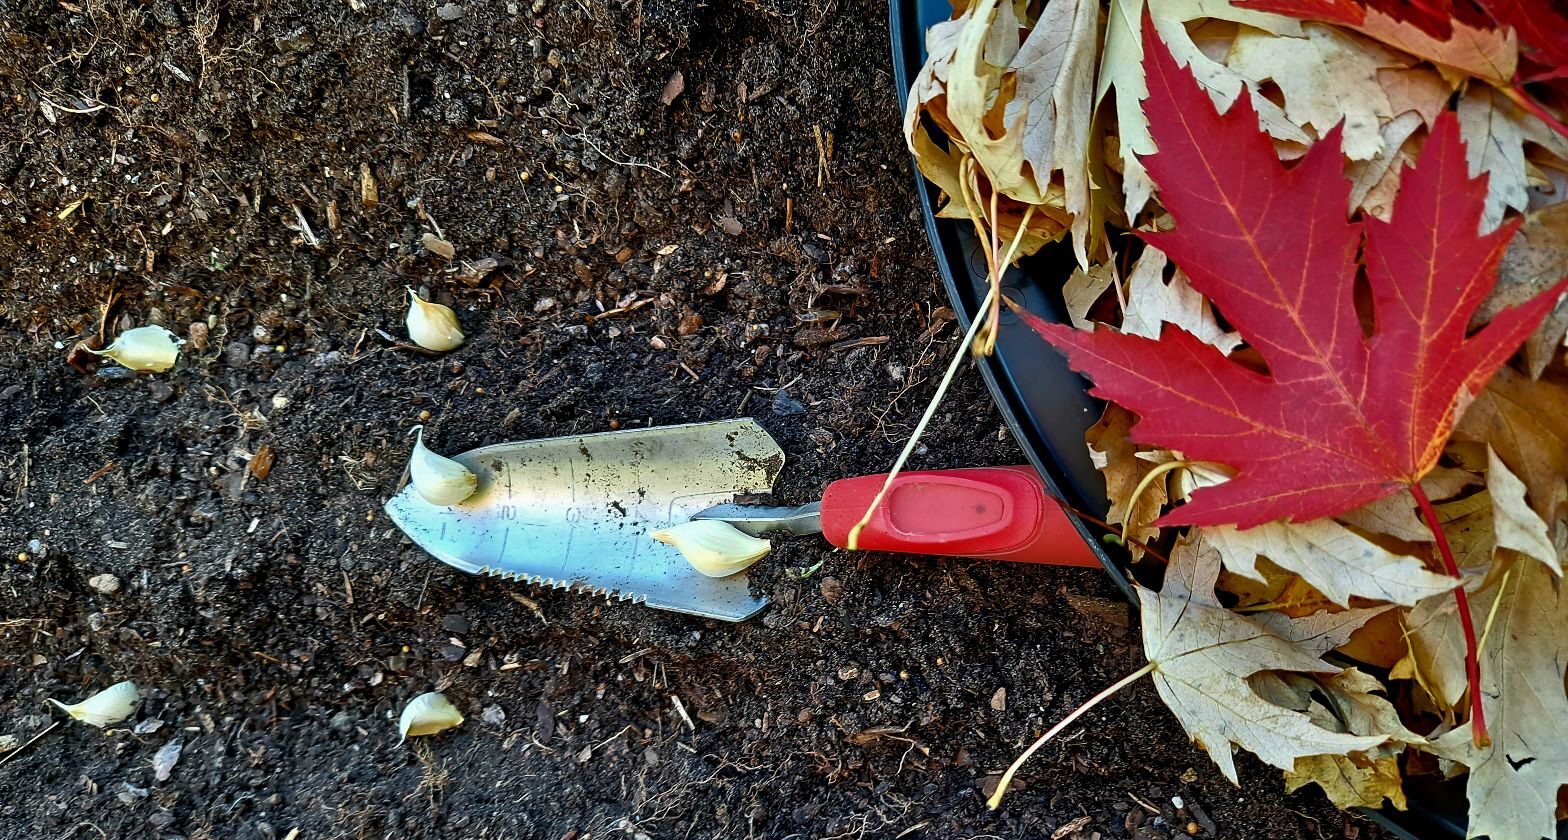
I made trenches for this fall planting of garlic that were about 1 1/2-2 inches deep. Then, I planted them 5 inches apart, using my ruled trowel. I made the rows about 5 inches apart, because they are in a raised bed. There is enough room for full bulbs to form, and I can reach them all just fine. There are many ranges I’ve read for spacing garlic, and I like to conserve my limited space. It is important to leave the cloves in the wrappers, and to keep them pointy-side up, to properly sprout.
I took the smallest cloves, pictured on the left below, and put them right next to each other in a clump, still pointing upwards. These will be harvested for garlic scallions, and not for their bulbs, which will likely be too small.

Cover, feed, protect
I covered the garlic evenly with soil, and tried to make it level. Take care to keep them pointing upwards when covering. This will keep them from growing underground and eventually rotting.
I added an inch of compost on top of them. Use fresh compost. That said, I reused compost that had a luffa formerly growing in it, because it was on hand. I removed most of the roots in the compost first.
Next, I set aside leaves to mulch it with in a week or two. This week is unseasonably very warm here, and I don’t want to rot the new plantings in the heat. They will need at least 4 inches of leaves or other mulch to protect them from the cold winter here.

Growing and Harvesting
While it’s growing, regularly check them to see when most of them sprout, so you can right the ones that you do not see, and face them point upwards, again. Garlic is a heavy feeder, so be sure to check it for yellow leaves in the spring and early summer. It definitely needs fertilizing in the spring.
Garlic takes about 8 months to grow. Hardneck garlic is ready once the top plant starts drying up and turning yellow in the summer. Softneck is ready once its top falls over, just like onions do, and will probably yellow as well. Do not water it for about a week and a half before harvesting it, so that the skin has plenty of time to dry first. Lift the garlic with your fingers or a garden fork from below, not by the stem. Take care to handle it very gently while harvesting, because freshly-picked garlic can bruise, and that leads to rot. For garlic that lasts for 4 months or more, first cure, and properly store it.
Curing and Storing
Curing is just hanging your garlic after harvest, to dry the entire plant out in your least humid area. They need good air circulation. Always pick a location out of direct sun. Hang either kind of garlic in bunches of 4-6. If you prefer larger bundles of softneck garlic, wait until it is cured, then you may braid and hang them. They need to cure for anywhere from 2 weeks (more likely) to 2 months, until the tops and skins are completely dry. You may then remove the muddiest parts of the skin, and trimming the tops shorter, keeping it dry. Leave most of the skin on to help it store better. If you separate the cloves from the bulb, some say they will only last a week or so; I suggest freezing them.
Store garlic in a cool, very dry place, and never in the fridge. Keep it out of direct sun. Hardneck may last 1-6 months in a cool, dry place. Softneck garlic may last 1-9 (some say 12) months, under ideal conditions. You may freeze whole cloves in a freezer bag and use them as needed. For more details on storing and using garlic, here is a pdf from UC Davis.
Disclaimer
None of the above is health advice. Please follow your local ordinances when planning which garlic to plant. Store and harvest your food, according to health regulations in your area. FYI, pet owners, garlic is toxic to at least cats and dogs per the ASPCA, so be careful processing garlic around them. I am not a health expert, veterinarian or a food safety expert. Stay safe, healthy and happy gardening!
